PowerShell
A collection of useful (debatable) PowerShell snippets.
Shell Customization
It is possible to modify the display and behavior of the PowerShell prompt by overriding the prompt function globally. Overriding this function in the $PROFILE file ensures that the settings are always loaded when starting a new shell.
Here's the function for the prompt I personally use:
PowerShell prompt
function global:prompt
{
    Write-Host -Object [$($Host.Version.Major).$($Host.Version.Minor)] -ForegroundColor DarkGray -NoNewline
    Write-Host -Object [$(Get-Date -Format "HH:mm:ss")] -ForegroundColor Blue -NoNewline
    Write-Host -Object [$($MyInvocation.HistoryId)] -ForegroundColor DarkGreen -NoNewline
    Write-Host -Object [$pwd] -ForegroundColor Darkgray
    return "> "
}
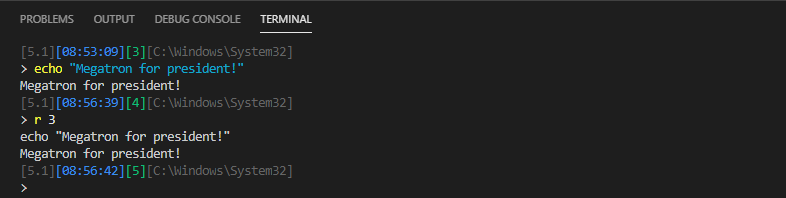
This will produce a prompt in line with the below format. I prefer to have the prompt on a separate line to avoid readability issues resulting from long line paths. Additionally, keeping track of the $MyInvocation.HistoryId allows for easy re-execution using the r alias.
[version][current time][history id][current folder]
>
Alias for Custom Function
Today (Aug 04, 2016) I realized that I had become sufficiently annoyed with typing mstsc -v <hostname/ip> to do something about it. Why can't I just simply type rdp, I thought to myself. Fortunately, there's an easy and convenient way of achieving this with PowerShell aliases and a custom profile.
First, we need to create a file for our profile. The path for the default PowerShell profile for the current user is stored in the variable $PROFILE. By default, this file doesn't exist, so we'll create it:
PS C:\> Test-Path $PROFILE
False
PS C:\> New-Item -Type File $PROFILE
Next, we'll open the profile file with a text, editor, e.g. Notepad:
notepad $PROFILE
We proceed define a simple function Connect-RDPSession and create an alias for it:
# Remote Desktop Helper function
Function Connect-RDPSession
{
    Param([Parameter(Mandatory=$true)][String]$ComputerName)

    Start-Process $env:windir\system32\mstsc.exe `
    -ArgumentList @("-v", "$ComputerName")
}

# Custom Aliases
New-Alias "rdp" Connect-RDPSession
At this point, we'll save and close the file. Having restarted PowerShell, we can now run our new command:
PS C:\> rdp
cmdlet Connect-RDPSession at command pipeline position 1
Supply values for the following parameters:
ComputerName:
A more complete discussion on on PowerShell profiles is available on Microsoft Docs.
Getting SID of Domain User without Get-ADUser
Today (Apr 21, 2016) I found myself writing a script where I needed the SID of a domain user without having access to the ActiveDirectory PowerShell module. Fortunately, there is an easy way to get around this using WMI filters:
> $UserName = "Test01"
> $User = Get-WmiObject Win32_UserAccount -Filter "Name='$UserName' and Domain='$env:USERDOMAIN'"
> $User
Caption     : MYDOMAIN\Test01
Domain      : MYDOMAIN
SID         : S-1-5-21-2697681978-3393342210-2800226786-1139
FullName    : Test User
Name        : Test01

$UserSid = $User.SID
Configuring Active Directory Certificate Services
This post will discuss configuring a newly deployed Active Directory Certificate Services (AD CS) Certification Authority (CA) using PowerShell. To demonstrate this, I will be configuring an Enrollment Agent for Smart Card certificates using mainly PowerShell. All commands referenced can be executed directly in a PowerShell session.
Windows Server 2012
This content was moved here from a previous location and is somewhat dated. Commands may not work with more recent versions of Windows Server.
Warning: Long post!
At a high level, the following steps will be performed:
- Create an account that will serve as a smart card Enrollment Agent
- Configure permissions on the CA object locally
- Import certificate templates into Active Directory and configure permissions
- Enable certificate templates for issuance
- Request an Enrollment Agent certificate
Enrollment Agent User
First things first. We'll need to create an account to serve as the Enrollment Agent:
$OU = New-ADOrganizationalUnit "Service Accounts" -PassThru
$EnrollmentAgentUser = New-ADUser SVC-EnrollmentAgent `
-DisplayName "Smart Card Enrollment Agent" -AccountPassword `
(ConvertTo-SecureString -AsPlainText "Password01" -Force) `
-Path $OU.DistinguishedName -Enabled $true -PassThru
-PassThru flag ensures the object created is returned. This is convenient as it allows us to directly store the objects in variables without having to use one of the Get-AD* cmdlets. CA Permissions
At this point, we will want to grab a copy of our CA object as presented in Active Directory. We'll use this variable to get the CA Common Name which we will use for multiple calls. Granted, this could be retrieved using a number of other tools, such as querying the Registry or using certutil -getconfig.
$CA = Get-ADObject -Filter 'ObjectClass -eq "certificationAuthority"' `
-SearchBase ("CN=Certification Authorities,CN=Public Key Services,CN=Services," `
+ (Get-ADRootDSE).configurationNamingContext)
We'll also grab a copy of our CA Enrollment Service object from the domain, making sure to include the certificateTemplates property (we'll need this later):
$EnrollmentSvc = Get-ADObject -Filter 'ObjectClass -eq "pKIEnrollmentService"' `
-SearchBase (Get-ADRootDSE).configurationNamingContext `
-Properties certificateTemplates
The CA permissions configuration is stored in the Registry of the machine running the CA service. The set of permissions is stored as a binary representation of RawSecurityDescriptor in a Registry flag named Security. We'll retreive the binary data and create a RawSecurityDescriptor object from it:
$BinaryData = Get-ItemProperty -Path `
("HKLM:\SYSTEM\CurrentControlSet\Services\CertSvc\Configuration\" + $CA.Name) `
-Name "Security"
$RawSecurityDescriptor = New-Object `
System.Security.AccessControl.RawSecurityDescriptor($BinaryData.Security,0)
The RawSecurityDescriptor object has a DiscretionaryAcl which contains all access rules (of type System.Security.AccessControl.QualifiedAce) applied to the object:
$RawSecurityDescriptor.DiscretionaryAcl[0]
BinaryLength       : 24
AceQualifier       : AccessAllowed
IsCallback         : False
OpaqueLength       : 0
AccessMask         : 1
SecurityIdentifier : S-1-5-32-544
AceType            : AccessAllowed
AceFlags           : ObjectInherit, ContainerInherit
IsInherited        : False
InheritanceFlags   : ContainerInherit, ObjectInherit
PropagationFlags   : None
AuditFlags         : None
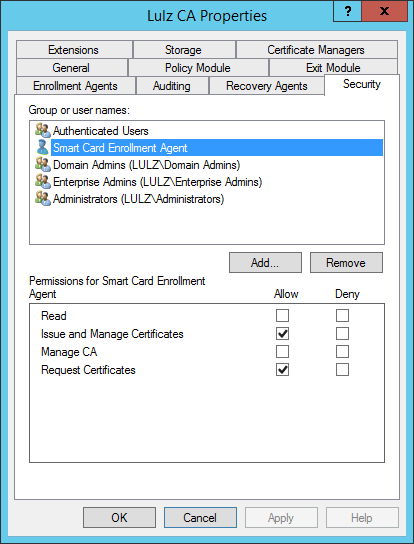
Permissions on the CA object are controlled through the AccessMask property of the DiscretionaryAcl object. These are the supported AccessMask values:
| Permission | Value |
|---|---|
| Read | 256 |
| Issue and Manage Certificates | 2 |
| Manage CA | 1 |
| Request Certificates | 512 |
For the Enrollment Agent, we want the 'Issue and Manage Certificates' and 'Request Certificates' permissions, so we'll use the Access Mask 514 (512 + 2). We can create a new CommonAce object using the supplied Constructor.
$CommonAce = New-Object System.Security.AccessControl.CommonAce("ObjectInherit, ContainerInherit","AccessAllowed","514",$EnrollmentAgentUser.SID,$false,$null)
Next, we'll insert our newly created object at the end of our DiscretionaryAcl:
$RawSecurityDescriptor.DiscretionaryAcl.InsertAce($RawSecurityDescriptor.DiscretionaryAcl.Count, $CommonAce)
At this point, we need to convert the object back into binary representation and insert it back into the Registry. In order to achieve this, we need to create a new Byte[] object to which we can copy the binary representation:
$NewRawSd = New-Object Byte[] $RawSecurityDescriptor.BinaryLength
$RawSecurityDescriptor.GetBinaryForm($NewRawSd, 0)
Set-ItemProperty -Path `
("HKLM:\SYSTEM\CurrentControlSet\Services\CertSvc\Configuration\" + $CA.Name) `
-Name "Security" -Value $NewRawSd
The Active Directory Certificate Services service needs to be restarted to reflect the change. The permissions and configuration are loaded from the Registry on startup:
Restart-Service certsvc
Certificate Templates
The next step is to create any required certificate templates, enable them for issuance and assign any required permissions. While the certificate template objects can be created using nothing but PowerShell, I prefer to re-use templates I have previously created in other environments and exported using ldifde.exe. However, when doing so, ensure that any read-only data is removed from the templates before attempting to re-import. The following attributes should be removed:
whenCreatedwhenChangeduSNCreateduSNChangedobjectGUID
I have prepared the following two .ldf files for this purpose:
LulzEnrollmentAgent.ldf
dn: CN=LulzEnrollmentAgent,CN=Certificate Templates,CN=Public Key Services,CN=Services,CN=Configuration,DC=lulz,DC=local
changetype: add
objectClass: top
objectClass: pKICertificateTemplate
cn: LulzEnrollmentAgent
distinguishedName: CN=LulzEnrollmentAgent,CN=Certificate Templates,CN=Public Key Services,CN=Services,CN=Configuration,DC=lulz,DC=local
instanceType: 4
displayName: Lulz Enrollment Agent
showInAdvancedViewOnly: TRUE
name: LulzEnrollmentAgent
flags: 131616
revision: 100
objectCategory: CN=PKI-Certificate-Template,CN=Schema,CN=Configuration,DC=lulz,DC=local
pKIDefaultKeySpec: 2
pKIKeyUsage:: gAA=
pKIMaxIssuingDepth: 0
pKICriticalExtensions: 2.5.29.15
pKIExpirationPeriod:: AIByDl3C/f8=
pKIOverlapPeriod:: AICmCv/e//8=
pKIExtendedKeyUsage: 1.3.6.1.4.1.311.20.2.1
dSCorePropagationData: 16010101000000.0Z
msPKI-RA-Signature: 0
msPKI-Enrollment-Flag: 32
msPKI-Private-Key-Flag: 50659328
msPKI-Certificate-Name-Flag: -2113929216
msPKI-Minimal-Key-Size: 2048
msPKI-Template-Schema-Version: 3
msPKI-Template-Minor-Revision: 3
msPKI-Cert-Template-OID: 1.3.6.1.4.1.311.21.8.10789001.6808044.12339630.2822925.11263764.212.1976732.14527522
msPKI-Certificate-Application-Policy: 1.3.6.1.4.1.311.20.2.1
msPKI-RA-Application-Policies: msPKI-Asymmetric-Algorithm`PZPWSTR`RSA`msPKI-Hash-Algorithm`PZPWSTR`SHA256`msPKI-Key-Usage`DWORD`2`msPKI-Symmetric-Algorithm`PZPWSTR`3DES`msPKI-Symmetric-Key-Length`DWORD`168`
LulzSmartCardLogon.ldf
dn: CN=LulzSmartcardLogon,CN=Certificate Templates,CN=Public Key Services,CN=Services,CN=Configuration,DC=lulz,DC=local
changetype: add
objectClass: top
objectClass: pKICertificateTemplate
cn: LulzSmartcardLogon
distinguishedName: CN=LulzSmartcardLogon,CN=Certificate Templates,CN=Public Key Services,CN=Services,CN=Configuration,DC=lulz,DC=local
instanceType: 4
displayName: Lulz Smartcard Logon
showInAdvancedViewOnly: TRUE
name: LulzSmartcardLogon
flags: 131584
revision: 100
objectCategory: CN=PKI-Certificate-Template,CN=Schema,CN=Configuration,DC=lulz,DC=local
pKIDefaultKeySpec: 1
pKIKeyUsage:: oAA=
pKIMaxIssuingDepth: 0
pKICriticalExtensions: 2.5.29.15
pKIExpirationPeriod:: AEA5hy7h/v8=
pKIOverlapPeriod:: AICmCv/e//8=
pKIExtendedKeyUsage: 1.3.6.1.4.1.311.20.2.2
pKIExtendedKeyUsage: 1.3.6.1.5.5.7.3.2
pKIDefaultCSPs: 1,Microsoft Smart Card Key Storage Provider
dSCorePropagationData: 16010101000000.0Z
msPKI-RA-Signature: 1
msPKI-Enrollment-Flag: 32
msPKI-Private-Key-Flag: 50659328
msPKI-Certificate-Name-Flag: -2113929216
msPKI-Minimal-Key-Size: 2048
msPKI-Template-Schema-Version: 3
msPKI-Template-Minor-Revision: 3
msPKI-Cert-Template-OID: 1.3.6.1.4.1.311.21.8.10789001.6808044.12339630.2822925.11263764.212.11688969.3755735
msPKI-Certificate-Application-Policy: 1.3.6.1.4.1.311.20.2.2
msPKI-Certificate-Application-Policy: 1.3.6.1.5.5.7.3.2
msPKI-RA-Application-Policies: msPKI-Asymmetric-Algorithm`PZPWSTR`RSA`msPKI-Hash-Algorithm`PZPWSTR`SHA256`msPKI-Key-Usage`DWORD`16777215`msPKI-RA-Application-Policies`PZPWSTR`1.3.6.1.4.1.311.20.2.1`msPKI-Symmetric-Algorithm`PZPWSTR`3DES`msPKI-Symmetric-Key-Length`DWORD`168`
We'll use the tried and tested ldifde.exe utility and the Start-Process cmdlet to import these into Active Directory:
$LdifdeArgs = @("-i", "-f", "LulzEnrollmentAgent.ldf")
Start-Process ldifde.exe -ArgumentList $LdifdeArgs
$LdifdeArgs[2] = "LulzSmartCardLogon.ldf"
Start-Process ldifde.exe -ArgumentList $LdifdeArgs
We can confirm our templates are now in AD:
Get-ADObject -Filter 'ObjectClass -eq "pKICertificateTemplate"' `
-SearchBase (Get-ADRootDSE).configurationNamingContext `
| Where-Object { $_.Name -like "Lulz*" }

DistinguishedName             Name                          ObjectClass                   ObjectGUID
-----------------             ----                          -----------                   ----------
CN=LulzEnrollmentAgent,CN=... LulzEnrollmentAgent           pKICertificateTemplate        e3e8d605-ebcf-41d2-a5ff-51...
CN=LulzSmartcardLogon,CN=C... LulzSmartcardLogon            pKICertificateTemplate        51b31c5f-58bc-4800-b4e8-b1...
Next, we will want to ensure our Enrollment Agent service account has permissions to enroll for both of these templates. This is done through the Certificate-Enrollment extended right and we'll need its GUID to perform this action. We'll create new ActiveDirectoryAccessRule objects for Read and Enroll respectively.
$EnrollGuid = New-Object guid 0e10c968-78fb-11d2-90d4-00c04f79dc55

$AceEnroll = New-Object System.DirectoryServices.ActiveDirectoryAccessRule `
$EnrollmentAgentUser.SID,"ExtendedRight","Allow",$EnrollGuid

$AceRead = New-Object System.DirectoryServices.ActiveDirectoryAccessRule `
$EnrollmentAgentUser.SID,"GenericRead","Allow"
Next, we'll apply these new access rules to the templates we created:
$Templates = Get-ADObject -Filter 'ObjectClass -eq "pKICertificateTemplate"' `
-SearchBase (Get-ADRootDSE).configurationNamingContext `
| Where-Object { $_.Name -like "Lulz*" }
ForEach ($T in $Templates)
{
    $Acl = Get-Acl AD:$T
    $Acl.AddAccessRule($AceEnroll)
    $Acl.AddAccessRule($AceRead)
    Set-Acl -AclObject $Acl AD:$T
}
Next, we need to enable these templates for issuance. This can be done by updating the Enrollment Service AD object:
ForEach ($T in $Templates)
{
    $EnrollmentSvc.certificateTemplates += $T.Name
}

Set-ADObject $EnrollmentSvc `
-Replace @{certificateTemplates=$EnrollmentSvc.certificateTemplates.Value}
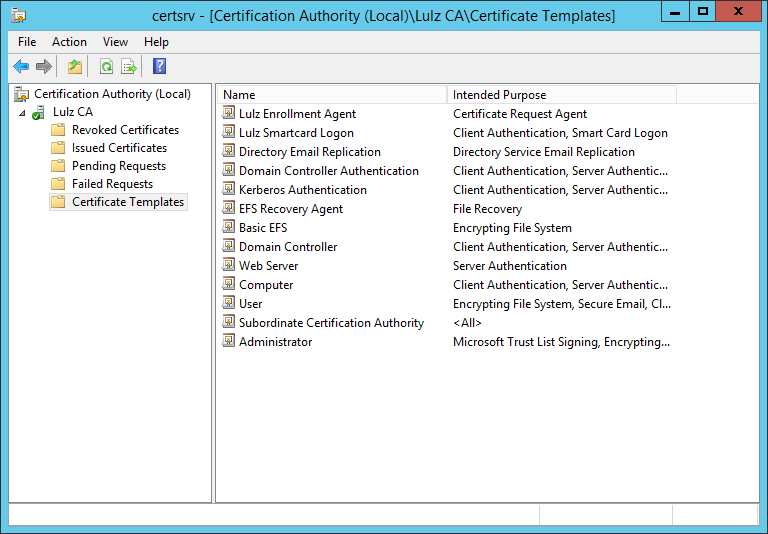
Finally, restart AD CS and we can see the new templates visible through the Certification Authority MMC Snap-in:
Restart-Service certsvc
Enrollment Agent Certificate
Now, we need to issue an Enrollment Agent Certificate for the service account. If running this command directly from the CA the Enrollment Agent User needs to have permissions to run commands locally.
$Credential = New-Object System.Management.Automation.PSCredential `
-ArgumentList $EnrollmentAgentUser.Name, `
(ConvertTo-SecureString "Password01" -AsPlainText -Force)

Start-Process -Credential $Credential certreq.exe `
-Args "-enroll -q LulzEnrollmentAgent"
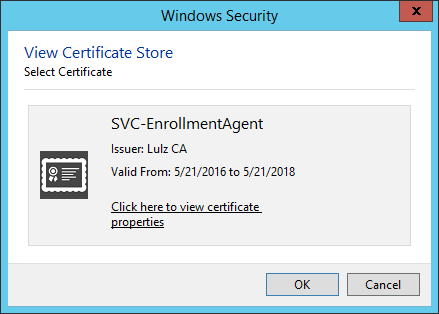
We can verify that the certificate was issued successfully by running the following command:
Start-Process -Credential $Credential certutil.exe -Args "-user -viewstore My"
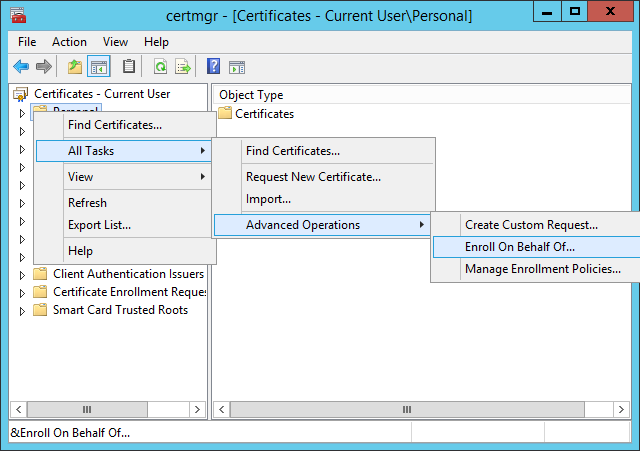
Now we can launch certmgr.msc as our Enrollment Agent User and request smart card certificates on behalf of users (Ridiculous runas-syntax required):
Start-Process powershell -Credential $Credential -ArgumentList '-noprofile -command &{Start-Process mmc.exe -ArgumentList certmgr.msc -Verb runas}'
Next, we'll request a certificate on behalf of a user, using All Tasks -> Advanced Operations -> Enroll On Behalf Of...
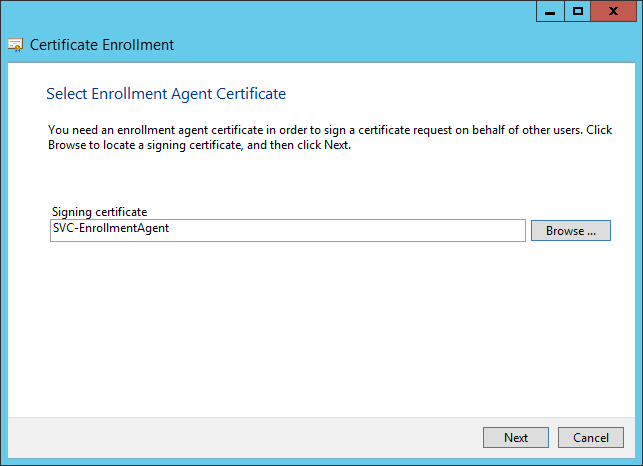
We'll skip through the ‘Before You Begin' and ‘Select Certificate Enrollment Policy' pages. On the ‘Select Enrollment Agent Certificate' page, we'll select the certificate we previously issued:
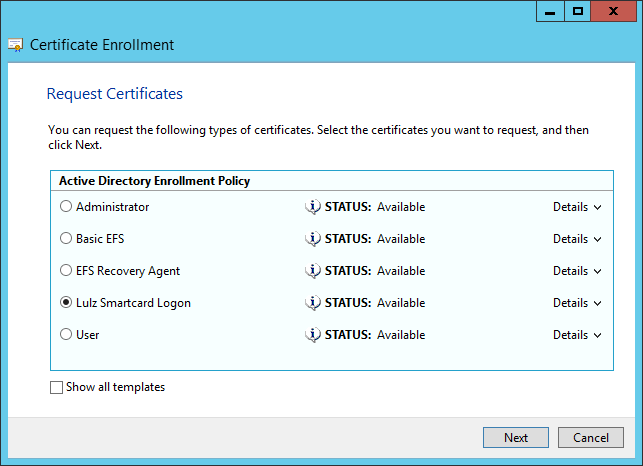
Select the Smart Card Logon template:
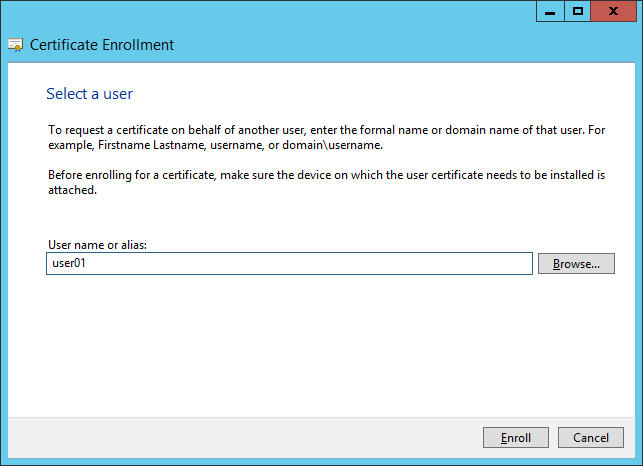
Select a user in Active Directory:
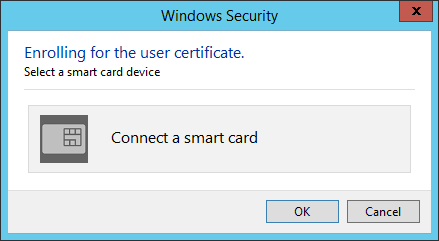
At this point, insert a smart card. I don't have one available at present that supports the Microsoft Smart Card Key Storage Provider KSP, but will try to update this post once I have one:
That concludes this article! Hopefully someone finds this useful.